RotatingSandwiches.com is a website showcasing animated GIF files of rotating
sandwiches1. But it’s got a problem: 2 of the 51 sandwiches rotate the
wrong way. So I’ve fixed it:
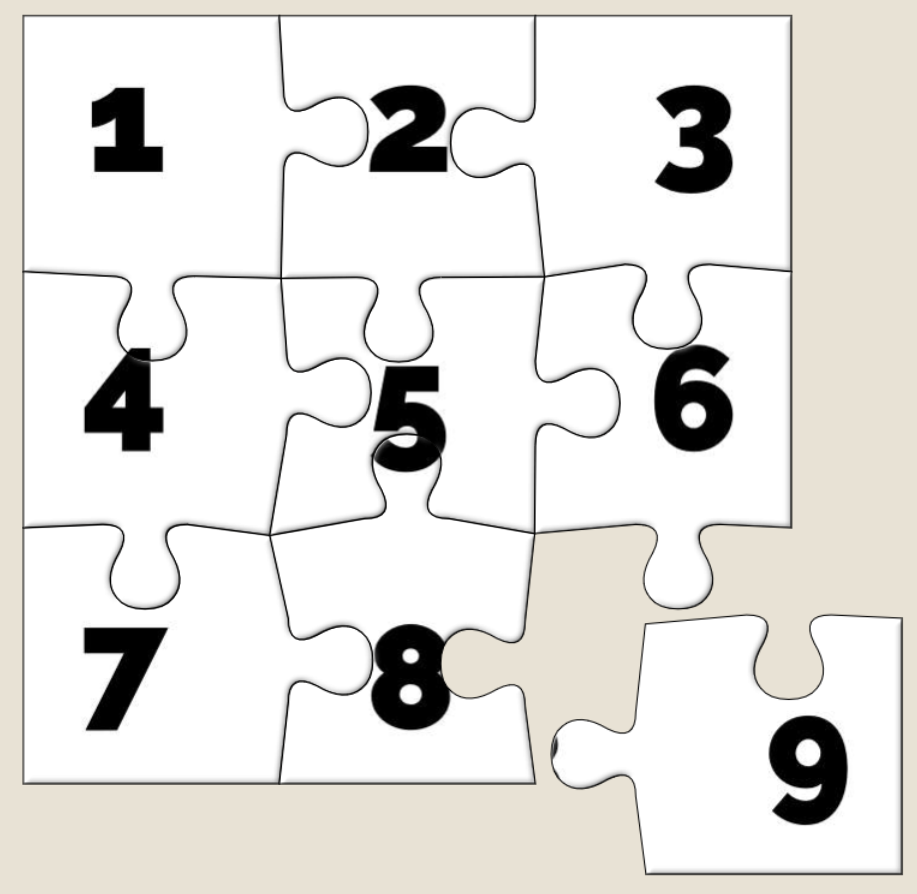
The Eggplant Parm Sub is one of two sandwiches whose rotation doesn’t match the rest.
My fix is available as a userscript on GreasyFork, so you can use your
favourite userscript manager2
to install it and the rotation will be fixed for you too. Here’s the code (it’s pretty simple):
 1
 2
 3
 4
 5
 6
 7
 8
 9
10
11
12
// ==UserScript==// @name Standardise sandwich rotation on rotatingsandwiches.com// @namespace rotatingsandwiches.com.danq.me// @match https://rotatingsandwiches.com/*// @grant GM_addStyle// @version 1.0// @author Dan Q <https://danq.me/>// @license The Unlicense / Public Domain// @description Some sandwiches on rotatingsandwiches.com rotate in the opposite direction to the majority. 😡 Let's fix that.// ==/UserScript==
GM_addStyle('.q23-image-216, .q23-image-217 { transform: scaleX(-1); }');
Unless you’re especially agitated by irregular sandwich rotation, this is perhaps the most-pointless userscript ever created. So why did I go to the trouble?
Fixing Websites
Obviously, I’m telling you this as a vehicle to talk about userscripts in general and why you should be using them.
But the real magic is being able to remix the web your way. With just a little bit of CSS or JavaScript experience you
can stop complaining that a website’s design has changed in some way you don’t like or that some functionality you use isn’t as powerful or convenient as you’d like and you can fix
it.
A website I used disables scrolling until all their (tracking, advertising, etc.) JavaScript loads, and my privacy blocker blocks those files: I could cave and disable my browser’s
privacy tools… but it was almost as fast to add setInterval(()=>document.body.style.overflow='', 200); to a userscript and now it’s fixed.
Don’t want a Sports section on your BBC News homepage (not just the RSS
feed!)? document.querySelector('a[href="/sport"]').closest('main > div').remove(). Sorted.
I’m a huge fan of building your own tools to “scratch your own itch”. Userscripts are a highly accessible introduction to doing so that even beginner programmers can get on board with
and start getting value from. More-advanced scripts can do immensely clever and powerful things, but even if you just use them to apply a few light CSS touches to your favourite websites, that’s still a win.
Footnotes
1 Remember when a website’s domain name used to be connected to what it was for?
RotatingSandwiches.com does.
I’m testing a handful of highly-experimental new features on my personal website using multivariate (“A/B”) testing.
“Dark Mode” is just one of the new features I’m testing out.
If you visit within the next day or so you’re likely to be randomly-selected to try out one of them. (If you’re not selected, you can manually enable one of the
experiments.)
I’d love to hear your feedback on these Very Serious New Features! Let me know which one(s) you see and whether you think they should become permanent fixtures on my site.
I was contacted this week by a geocacher called Dominik who, like me, loves geocaching…. but hates it when the coordinates for a cache are hidden behind a virtual jigsaw puzzle.
A popular online jigsaw tool used by lazy geocache owners is Jigidi: I’ve come up with severaltechniques for bypassing their puzzles or at least making
them easier.
Not just any puzzle; the geocache used an ~1000 piece puzzle! Ugh!
I experimented with a few ways to work-around the jigsaw, e.g. dramatically increasing the “snap range” so dragging a piece any distance would result in it jumping to a
neighbour, and extracting original image URLs from localStorage. All were good, but none were
perfect.
For a while, making pieces “snap” at any range seemed to be the best hacky workaround.
Then I realised that – unlike Jigidi, where there can be a congratulatory “completion message” (with e.g. geocache coordinates in) – in JigsawExplorer the prize is seeing the
completed jigsaw.
You can click a button to see the “box” of a jigsaw, but this can be disabled by the image uploader.
Let’s work on attacking that bit of functionality. After all: if we can bypass the “added challenge” we’ll be able to see the finished jigsaw and, therefore, the geocache
coordinates. Like this:
Hackaround
Here’s how it’s done. Or keep reading if you just want to follow the instructions!
Open a jigsaw and try the “box cover” button at the top. If you get the message “This puzzle’s box top preview is disabled for added challenge.”, carry on.
Open your browser’s debug tools (F12) and navigate to the Sources tab.
Find the jigex-prog.js file. Right-click and select Override Content (or Add Script Override).
In the overridden version of the file, search for the string – e&&e.customMystery?tt.msgbox("This puzzle's box top preview is disabled for added challenge."): –
this code checks if the puzzle has the “custom mystery” setting switched on and if so shows the message, otherwise (after the :) shows the box cover.
Carefully delete that entire string. It’ll probably appear twice.
Reload the page. Now the “box cover” button will work.
The moral, as always, might be: don’t put functionality into the client-side JavaScript if you don’t want the user to be able to bypass it.
Or maybe the moral is: if you’re going to make a puzzle geocache, put some work in and do something clever, original, and ideally with fieldwork rather than yet another low-effort
“upload a picture and choose the highest number of jigsaw pieces to cut it into from the dropdown”.
Progressive enhancement is a great philosophy for Web application development. Deliver all the essential basic functionality using the simplest standards available; use advanced
technologies to add bonus value and convenience features for users whose platform supports them. Win.
JavaScript disabled/enabled is one of the most-fundamental ways to differentiate a basic from an enhanced experience, but it’s absolutely not the only way (especially now that feature
detection in JavaScript and in CSS has become so powerful!).
In Three Rings, for example, volunteers can see a “starchart” of the volunteering shifts they’ve done recently, at-a-glance, on
their profile page1.
In the most basic case, this is usable in its HTML-only form: even with no JavaScript, no CSS, no images even, it still functions. But if JavaScript is enabled, the volunteer can dynamically “filter” the year(s) of volunteering
they’re viewing. Basic progressive enhancement.
If a feature requires JavaScript, my usual approach is to use JavaScript to add the relevant user interface to the page in the first place. Those starchart filters in Three
Rings don’t appear at all if JavaScript is disabled. A downside to this approach is that the JavaScript necessarily modifies the DOM on page load, which introduces a delay to the page being interactive as well as potentially resulting in layout shift.
That’s not always the best approach. I was reminded of this today by the website of 7-year-old Shiro (produced with, one assumes, at least
a little help from Saneef H. Ansari). Take a look at this progressively-enhanced theme switcher:
No layout shift, no
DOM manipulation. And yet it’s still pretty clear what features are available.
The HTML that’s delivered over-the-wire provides a disabled<select> element, which gains the CSS directive cursor: not-allowed;, to make it clear to the used that this dropdown doesn’t do anything. The whole thing’s wrapped
in a custom element.
When that custom element is defined by the JavaScript, it enhances the dropdown with an event listener that implements the theme changes, then enables the disabled
<select>.
I’m not convinced by the necessity of the <form> if there’s no HTML-only fallback… and the <label>
probably should use a for="..." rather than wrapping the <select>, but otherwise this code is absolutely gorgeous.
It’s probably no inconvenience to the minority of JS-less users to see a theme switcher than, when they go to use it, turns out to be
disabled. But it saves time for virtually everybody not to have to wait for JavaScript to manipulate the DOM, or else to risk
shifting the layout by revealing a previously-hidden element.
Altogether, this is a really clever approach, and I was pleased today to be reminded – by a 7-year-old! – of the elegance of this approach. Nice one Shiro (and Saneef!).
Footnotes
1 Assuming that administrators at the organisation where they volunteer enable this
feature for them, of course: Three Rings‘ permission model is robust and highly-customisable. Okay, that’s enough sales pitch.
A year and a half ago I came up with a technique for intercepting the “shuffle” operation
on jigsaw website Jigidi, allowing players to force the pieces to appear in a consecutive “stack” for ludicrously easy solving. I did this
partially because I was annoyed that a collection of geocaches near me used Jigidi puzzles as a barrier to their coordinates1…
but also because I enjoy hacking my way around artificially-imposed constraints on the Web (see, for example, my efforts last week to circumvent region-blocking on radio.garden).
My solver didn’t work for long: code changes at Jigidi’s end first made it harder, then made it impossible, to use the approach I suggested. That’s fine by me – I’d already got what I
wanted – but the comments thread on that post suggests that there’s
a lot of people who wish it still worked!2
And so I ignored the pleas of people who wanted me to re-develop a “Jigidi solver”. Until recently, when I once again needed to solve a jigsaw puzzle in order to find a geocache’s
coordinates.
Making A Jigidi Helper
Rather than interfere with the code provided by Jigidi, I decided to take a more-abstract approach: swapping out the jigsaw’s image for one that would be easier.
This approach benefits from (a) having multiple mechanisms of application: query interception, DNS hijacking, etc., meaning that if one stops working then another one can be easily
rolled-out, and (b) not relying so-heavily on the structure of Jigidi’s code (and therefore not being likely to “break” as a result of future upgrades to Jigidi’s platform).
It’s not as powerful as my previous technique – more a “helper” than a “solver” – but it’s good enough to shave at least half the time off that I’d otherwise spend solving a Jigidi
jigsaw, which means I get to spend more time out in the rain looking for lost tupperware. (If only geocaching were even the weirdest of my hobbies…)
How To Use The Jigidi Helper
To do this yourself and simplify your efforts to solve those annoying “all one colour” or otherwise super-frustrating jigsaw puzzles, here’s what you do:
Visit a Jigidi jigsaw. Do not be logged-in to a Jigidi account.
Open your browser’s debug tools (usually F12). In the Console tab, paste it and press enter. You can close your debug tools again (F12) if you like.
Press Jigidi’s “restart” button, next to the timer. The jigsaw will restart, but the picture will be replaced with one that’s easier-to-solve than most, as described below.
Once you solve the jigsaw, the image will revert to normal (turn your screen around and show off your success to a friend!).
What makes it easier to solve?
The replacement image has the following characteristics that make it easier to solve than it might otherwise be:
Every piece has written on it the row and column it belongs in.
Every “column” is striped in a different colour.
Striped “bands” run along entire rows and columns.
To solve the jigsaw, start by grouping colours together, then start combining those that belong in the same column (based on the second digit on the piece). Join whole or partial
columns together as you go.
I’ve been using this technique or related ones for over six months now and no code changes on Jigidi’s side have impacted upon it at all, so it’s probably got better longevity than the
previous approach. I’m not entirely happy with it, and you might not be either, so feel free to fork my code and improve it: the legiblity of the numbers is sometimes suboptimal, and
the colour banding repeats on larger jigsaws which I’d rather avoid. There’s probably also potential to improve colour-recognition by making the colour bands span the gaps
between rows or columns of pieces, too, but more experiments are needed and, frankly, I’m not the right person for the job. For the second time, I’m going to abandon a tool
that streamlines Jigidi solving because I’ve already gotten what I needed out of it, and I’ll leave it up to you if you want to come up with an improvement and share it with the
community.
Footnotes
1 As I’ve mentioned before, and still nobody believes me: I’m not a fan of jigsaws! If you
enjoy them, that’s great: grab a bucket of popcorn and a jigsaw and go wild… but don’t feel compelled to share either with me.
2 The comments also include asuper-helpful person called Rich who’s been manually
solving people’s puzzles for them, and somebody called Perdita
who “could be my grandmother” (except: no) with whom I enjoyed a
conversation on- and off-line about the ethics of my technique. It’s one of the most-popular comment threads my blog has ever seen.
I’m off work sick today: it’s just a cold, but it’s had a damn good go at wrecking my lungs and I feel pretty lousy. You know how when you’ve got too much of a brain-fog to trust
yourself with production systems but you still want to write code (or is that just me?), so this morning I threw together a really,
really stupid project which you can play online here.
It’s a board game. Well, the digital edition of one. Also, it’s not very good.
It’s inspired by a toot by Mason”Tailsteak” Williams (whom I’ve mentioned before once or
twice). At first I thought I’d try to calculate the odds of winning at his proposed game, or how many times one might expect to play before winning,
but I haven’t the brainpower for that in my snot-addled brain. So instead I threw together a terrible, terrible digital implementation.
Go play it if, like me, you’ve got nothing smarter that your brain can be doing today.
Finally got around to implementing a super-lightweight (~20 lines of code, 1 dependency) #spring83 key generator. There are plenty of others; nobody needs this one, but it’s free if you
want it:
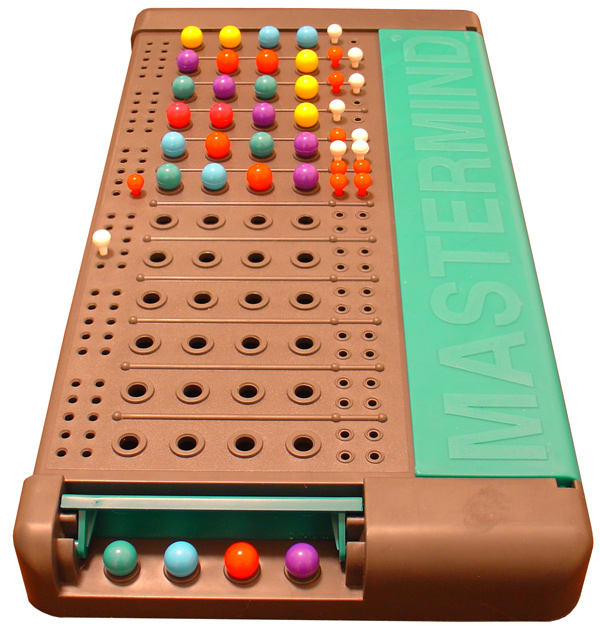
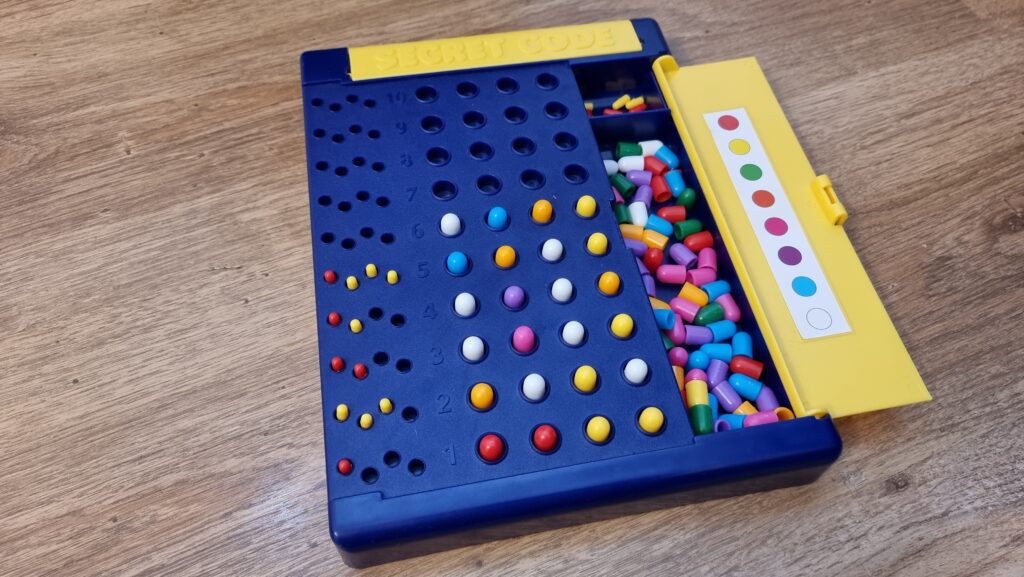
I swear that I used to be good at Mastermind when I was a kid. But now, when it’s my turn to break
the code that one of our kids has chosen, I fail more often than I succeed. That’s no good!
If you didn’t have me pegged as a board gamer… where the hell have you been?
Mastermind and me
Maybe it’s because I’m distracted; multitasking doesn’t help problem-solving. Or it’s because we’re “Super” Mastermind, which differs from the one I had as a child in that
eight (not six) peg colours are available and secret codes are permitted to have duplicate peg colours. These changes increase the possible permutations from 360 to 4,096, but the
number of guesses allowed only goes up from 8 to 10. That’s hard.
The set I had as a kid was like this, I think. Photo courtesy ZeroOne; CC-BY-SA license.
Hey, that’s an idea. Let’s crack the code… by writing some code!
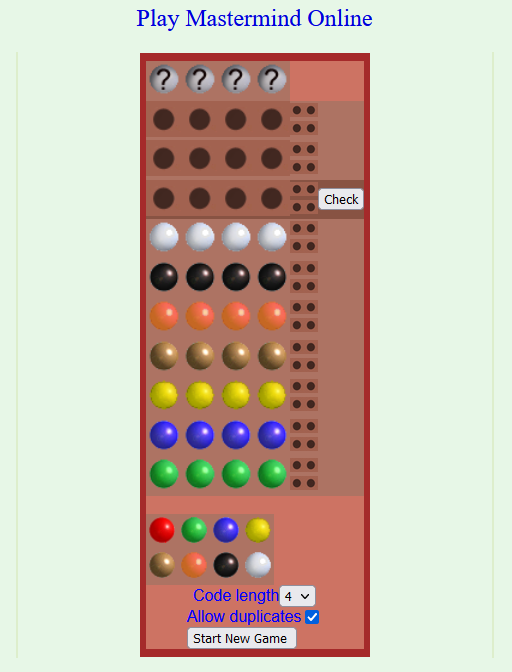
This online edition plays a lot like the version our kids play, although the peg colours are different. Next guess should be an
easy solve!
Representing a search space
The search space for Super Mastermind isn’t enormous, and it lends itself to some highly-efficient computerised storage.
There are 8 different colours of peg. We can express these colours as a number between 0 and 7, in three bits of binary, like this:
Decimal
Binary
Colour
0
000
Red
1
001
Orange
2
010
Yellow
3
011
Green
4
100
Blue
5
101
Pink
6
110
Purple
7
111
White
There are four pegs in a row, so we can express any given combination of coloured pegs as a 12-bit binary number. E.g. 100 110 111 010 would represent the
permutation blue (100), purple (110), white (111), yellow (010). The total search space, therefore, is the range of numbers from
000000000000 through 111111111111… that is: decimal 0 through 4,095:
Decimal
Binary
Colours
0
000000000000
Red, red, red, red
1
000000000001
Red, red, red, orange
2
000000000010
Red, red, red, yellow
…………
4092
111111111100
White, white, white, blue
4093
111111111101
White, white, white, pink
4094
111111111110
White, white, white, purple
4095
111111111111
White, white, white, white
Whenever we make a guess, we get feedback in the form of two variables: each peg that is in the right place is a bull; each that represents a peg in the secret code but
isn’t in the right place is a cow (the names come from Mastermind’s precursor, Bulls & Cows). Four bulls
would be an immediate win (lucky!), any other combination of bulls and cows is still valuable information. Even a zero-score guess is valuable- potentially very valuable! – because it
tells the player that none of the pegs they’ve guessed appear in the secret code.
If one of Wordle‘s parents was Scrabble, then this was the other. Just ask its Auntie Twitter.
Solving with Javascript
The latest versions of Javascript support binary literals and bitwise operations, so we can encode and decode between arrays of four coloured pegs (numbers 0-7) and the number 0-4,095
representing the guess as shown below. Decoding uses an AND bitmask to filter to the requisite digits then divides by the order of magnitude. Encoding is just a reduce
function that bitshift-concatenates the numbers together.
/** * Decode a candidate into four peg values by using binary bitwise operations. */function decodeCandidate(candidate){
return [
(candidate &0b111000000000) /0b001000000000,
(candidate &0b000111000000) /0b000001000000,
(candidate &0b000000111000) /0b000000001000,
(candidate &0b000000000111) /0b000000000001
];
}
/** * Given an array of four integers (0-7) to represent the pegs, in order, returns a single-number * candidate representation. */function encodeCandidate(pegs) {
return pegs.reduce((a, b)=>(a <<3) + b);
}
With this, we can simply:
Produce a list of candidate solutions (an array containing numbers 0 through 4,095).
Choose one candidate, use it as a guess, and ask the code-maker how it scores.
Eliminate from the candidate solutions list all solutions that would not score the same number of bulls and cows for the guess that was made.
Repeat from step #2 until you win.
Step 3’s the most important one there. Given a function getScore( solution, guess ) which returns an array of [ bulls, cows ] a given guess would
score if faced with a specific solution, that code would look like this (I’m convined there must be a more-performant way to eliminate candidates from the list with XOR
bitmasks, but I haven’t worked out what it is yet):
/** * Given a guess (array of four integers from 0-7 to represent the pegs, in order) and the number * of bulls (number of pegs in the guess that are in the right place) and cows (number of pegs in the * guess that are correct but in the wrong place), eliminates from the candidates array all guesses * invalidated by this result. Return true if successful, false otherwise. */function eliminateCandidates(guess, bulls, cows){
const newCandidatesList = data.candidates.filter(candidate=>{
const score = getScore(candidate, guess);
return (score[0] == bulls) && (score[1] == cows);
});
if(newCandidatesList.length ==0) {
alert('That response would reduce the candidate list to zero.');
returnfalse;
}
data.candidates = newCandidatesList;
chooseNextGuess();
returntrue;
}
I continued in this fashion to write a full solution (source code). It uses ReefJS for
component rendering and state management, and you can try it for yourself right in your web browser. If you play against the online version I mentioned you’ll need to transpose the colours in your head: the physical version I play with the kids has pink and
purple pegs, but the online one replaces these with brown and black.
Testing the solution
Let’s try it out against the online version:
As expected, my code works well-enough to win the game every time I’ve tried, both against computerised and in-person opponents. So – unless you’ve been actively thinking about the
specifics of the algorithm I’ve employed – it might surprise you to discover that… my solution is very-much a suboptimal one!
My code has only failed to win a single game… and that turned out to because my opponent, playing overexcitedly, cheated in the third turn. To be fair, my code didn’t lose
either, though: it identified that a mistake must have been made and we declared the round void when we identified the problem.
My solution is suboptimal
A couple of games in, the suboptimality of my solution became pretty visible. Sure, it still won every game, but it was a blunt instrument, and anybody who’s seriously thought about
games like this can tell you why. You know how when you play e.g. Wordle (but not in “hard mode”) you sometimes want to type in a word that can’t possibly be the
solution because it’s the best way to rule in (or out) certain key letters? This kind of strategic search space bisection reduces the mean number of guesses you need to solve the
puzzle, and the same’s true in Mastermind. But because my solver will only propose guesses from the list of candidate solutions, it can’t make this kind of improvement.
My blog post about Break Into Us used a series of visual metaphors to show search space dissection, including this one. If you missed
it, it might be worth reading.
Search space bisection is also used in my adverserial hangman game, but in this case the aim is to split the search space in such a way that no
matter what guess a player makes, they always find themselves in the larger remaining portion of the search space, to maximise the number of guesses they have to make. Y’know, because
it’s evil.
A great first guess, assuming you’re playing against a random code and your rules permit the code to have repeated colours, is a “1122” pattern.
There are mathematically-derived heuristics to optimise Mastermind strategy. The first
of these came from none other than Donald Knuth (legend of computer science, mathematics, and pipe organs) back in 1977. His solution,
published at probably the height of the game’s popularity in the amazingly-named Journal of Recreational Mathematics, guarantees a solution to the six-colour version of the
game within five guesses. Ville [2013] solved an
optimal solution for a seven-colour variant, but demonstrated how rapidly the tree of possible moves grows and the need for early pruning – even with powerful modern computers – to
conserve memory. It’s a very enjoyable and readable paper.
But for my purposes, it’s unnecessary. My solver routinely wins within six, maybe seven guesses, and by nonchalantly glancing at my phone in-between my guesses I can now reliably guess
our children’s codes quickly and easily. In the end, that’s what this was all about.
Different games in the same style (absurdle plays adversarially like my cheating hangman
game, crosswordle involves reverse-engineering a wordle colour grid into a crossword, heardle
is like Wordle but sounding out words using the IPA…)
I’m sure that by now all your social feeds are full of people playing Wordle. But the cool nerds are playing something new…
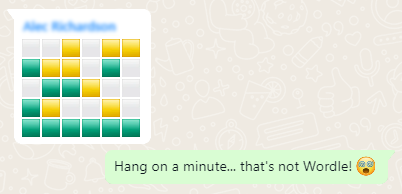
Now, a Wordle clone for D&D players!
But you know what hasn’t been seen before today? A Wordle clone where you have to guess a creature from the Dungeons & Dragons (5e) Monster Manual by putting numeric values into a
character sheet (STR, DEX, CON, INT, WIS, CHA):
Just because nobody’s asking for a game doesn’t mean you shouldn’t make it anyway.
What are you waiting for: go give DNDle a try (I pronounce it “dindle”, but you can pronounce it however you like). A new monster
appears at 10:00 UTC each day.
And because it’s me, of course it’s open source and works offline.
The boring techy bit
Like Wordle, everything happens in your browser: this is a “backendless” web application.
I’ve used ReefJS for state management, because I wanted something I could throw together quickly but I didn’t want to drown myself (or my players)
in a heavyweight monster library. If you’ve not used Reef before, you should give it a go: it’s basically like React but a tenth of the footprint.
A cache-first/background-updating service worker means that it can run completely offline: you can install it to your homescreen in the
same way as Wordle, but once you’ve visited it once it can work indefinitely even if you never go online again.
I don’t like to use a buildchain that’s any more-complicated than is absolutely necessary, so the only development dependency is rollup. It
resolves my import statements and bundles a single JS file for the browser.
tl;dr? Just want instructions on how to solve Jigidi puzzles really fast with the help of your browser’s dev tools? Skip to that bit.
This approach doesn’t work any more. Want to see one that still does (but isn’t quite so automated)? Here you go!
I don’t enjoy jigsaw puzzles
I enjoy geocaching. I don’t enjoy jigsaw puzzles. So mystery caches that require you to solve an online jigsaw puzzle in order to get the coordinates really
don’t do it for me. When I’m geocaching I want to be outdoors exploring, not sitting at my computer gradually dragging pixels around!
Many of these mystery caches use Jigidi to host these jigsaw puzzles. An earlier version of Jigidi was auto-solvable with a userscript, but the service has continued to be developed and evolve and the current version works quite hard to
make it hard for simple scripts to solve. For example, it uses a WebSocket connection to telegraph back to the server how pieces are moved around and connected to one another and the
server only releases the secret “you’ve solved it” message after it detects that the pieces have been arranged in the appropriate relative configuration.
If there’s one thing I enjoy more than jigsaw puzzles – and as previously established there are about a billion things I enjoy more than jigsaw puzzles – it’s reverse-engineering a
computer system to exploit its weaknesses. So I took a dive into Jigidi’s client-side source code. Here’s what it does:
Get from the server the completed image and the dimensions (number of pieces).
Cut the image up into the appropriate number of pieces.
Shuffle the pieces.
Establish a WebSocket connection to keep the server up-to-date with the relative position of the pieces.
Start the game: the player can drag-and-drop pieces and if two adjacent pieces can be connected they lock together. Both pieces have to be mostly-visible (not buried under other
pieces), presumably to prevent players from just making a stack and then holding a piece against each edge of it to “fish” for its adjacent partners.
I spent some time tracing call stacks to find this line… only to discover that it’s one of only four lines to actually contain the word “shuffle” and I could have just searched for
it…
Looking at that process, there’s an obvious weak point – the shuffling (point 3) happens client-side, and before the WebSocket sync begins. We could override the
shuffling function to lay the pieces out in a grid, but we’d still have to click each of them in turn to trigger the connection. Or we could skip the shuffling entirely and just leave
the pieces in their default positions.
An unshuffled jigsaw appears as a stack, as if each piece from left to right and then top to bottom were placed one at a time into a pile.
And what are the default positions? It’s a stack with the bottom-right jigsaw piece on the top, the piece to the left of it below it, then the piece to the left of that and son on
through the first row… then the rightmost piece from the second-to-bottom row, then the piece to the left of that, and so on.
That’s… a pretty convenient order if you want to solve a jigsaw. All you have to do is drag the top piece to the right to join it to the piece below that. Then move those two to the
right to join to the piece below them. And so on through the bottom row before moving back – like a typewriter’s carriage return – to collect the second-to-bottom row and so on.
How can I do this?
If you’d like to cheat at Jigidi jigsaws, this approach works as of the time of writing. I used Firefox, but the same basic approach should work with virtually any modern desktop web
browser.
Go to a Jigidi jigsaw in your web browser.
Pop up your browser’s developer tools (F12, usually) and switch to the Debugger tab. Open the file game/js/release.js and uncompress it by pressing the
{} button, if necessary.
Find the line where the code considers shuffling; right now for me it’s like 3671 and looks like this:
return this.j ? (V.info('board-data-bytes already exists, no need to send SHUFFLE'), Promise.resolve(this.j)) : new Promise(function (d, e) {
I spent some time tracing call stacks to find this line… only to discover that it’s one of only four lines to actually contain the word “shuffle” and I could have just searched
for it…
Set a breakpoint on that line by clicking its line number.
Restart the puzzle by clicking the restart button to the right of the timer. The puzzle will reload but then stop with a “Paused on breakpoint” message. At this point the
application is considering whether or not to shuffle the pieces, which normally depends on whether you’ve started the puzzle for the first time or you’re continuing a saved puzzle from
where you left off.
In the developer tools, switch to the Console tab.
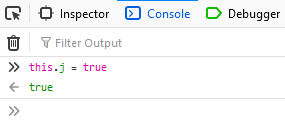
Type: this.j = true (this ensures that the ternary operation we set the breakpoint on will resolve to the true condition, i.e. not shuffle the pieces).
Press the play button to continue running the code from the breakpoint. You can now close the developer tools if you like.
Solve the puzzle as described/shown above, by moving the top piece on the stack slightly to the right, repeatedly, and then down and left at the end of each full row.
Update 2021-09-22:Abraxas observes that Jigidi have changed
their code, possibly in response to this shortcut. Unfortunately for them, while they continue to perform shuffling on the client-side they’ll always be vulnerable to this kind of
simple exploit. Their new code seems to be named not release.js but given a version number; right now it’s 14.3.1977. You can still expand it in the same way,
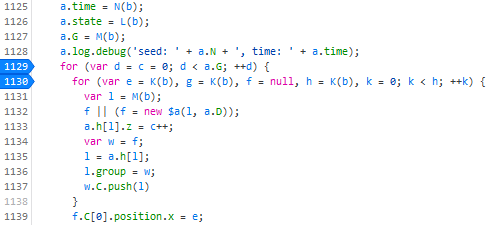
and find the shuffling code: right now for me this starts on line 1129:
Put a breakpoint on line 1129. This code gets called twice, so the first time the breakpoint gets hit just hit continue and play on until the second time. The second time it gets hit,
move the breakpoint to line 1130 and press continue. Then use the console to enter the code d = a.G and continue. Only one piece of jigsaw will be shuffled; the rest will
be arranged in a neat stack like before (I’m sure you can work out where the one piece goes when you get to it).
Update 2023-03-09: I’ve not had time nor inclination to re-“break” Jigidi’s shuffler, but on the rare ocassions I’ve
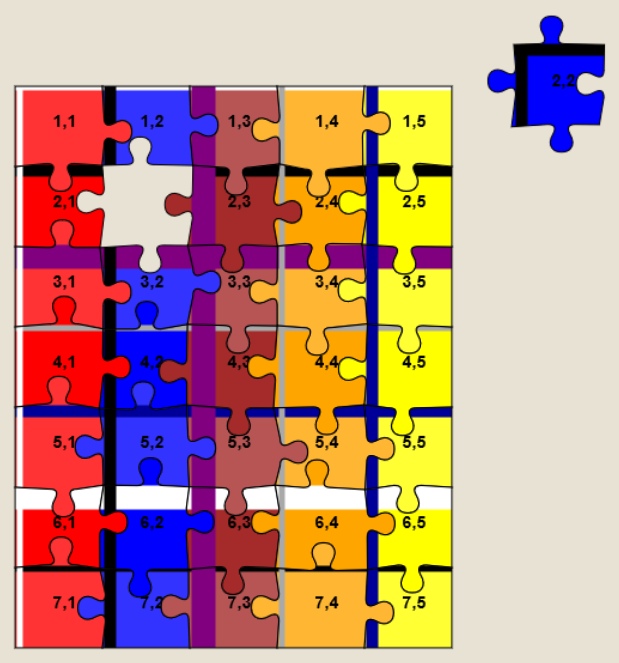
needed to solve a Jigidi, I’ve come up with a technique that replaces a jigsaw’s pieces with ones that each
show the row and column number they belong to, as well as colour-coding the rows and columns and drawing horizontal and vertical bars to help visual alignment. It makes the process
significantly less-painful. It’s still pretty buggy code though and I end up tweaking it each and every time I use it, but it certainly works and makes jigsaws that lack clear visual
markers (e.g. large areas the same colour) a lot easier.
As I mentioned last year, for several years I’ve collected pretty complete historic location data from GPSr devices I carry with me everywhere, which I collate in a personal μlogger server.
Going back further, I’ve got somewhat-spotty data going back a decade, thanks mostly to the fact that I didn’t get around to opting-out of Google’s location tracking until only a few years ago (this data is now
also housed in μlogger). More-recently, I now also get tracklogs from my smartwatch, so I’m managing to collate more personal
location data than ever before.
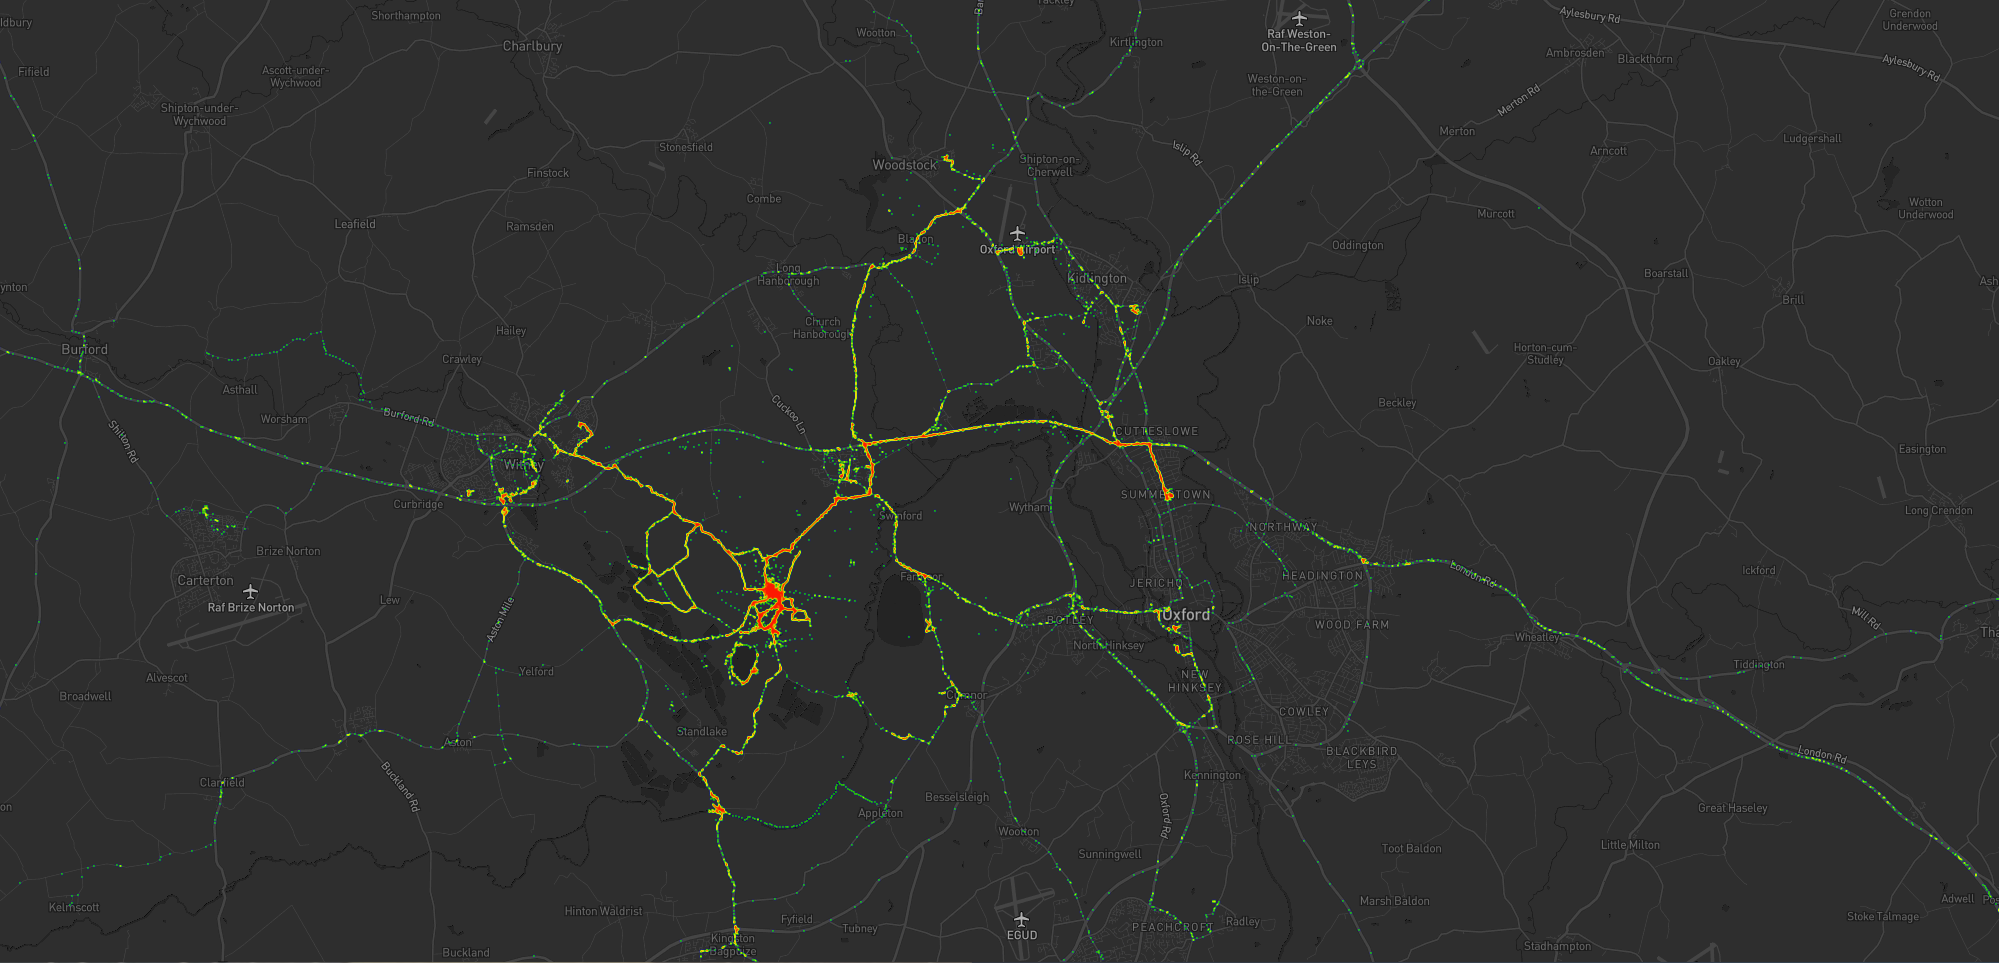
The blob around my house, plus some of the most common routes I take to e.g. walk or cycle the children to school.
A handful of my favourite local walking and cycling routes, some of which stand out very well: e.g. the “loop” just below the big blob represents a walk around the lake at Dix Pit;
the blob on its right is the Devils Quoits, a stone circle and henge that I thought were sufficiently interesting that
I made a virtual geocache out of them.
The most common highways I spend time on: two roads into Witney, the road into and around Eynsham, and routes to places in Woodstock and North Oxford where the kids have often had
classes/activities.
I’ve unsurprisingly spent very little time in Oxford City Centre, but when I have it’s most often been at the Westgate Shopping Centre,
on the roof of which is one of the kids’ favourite restaurants (and which we’ve been able to go to again as Covid restrictions have lifted, not least thanks to their outdoor seating!).
One to eight years ago
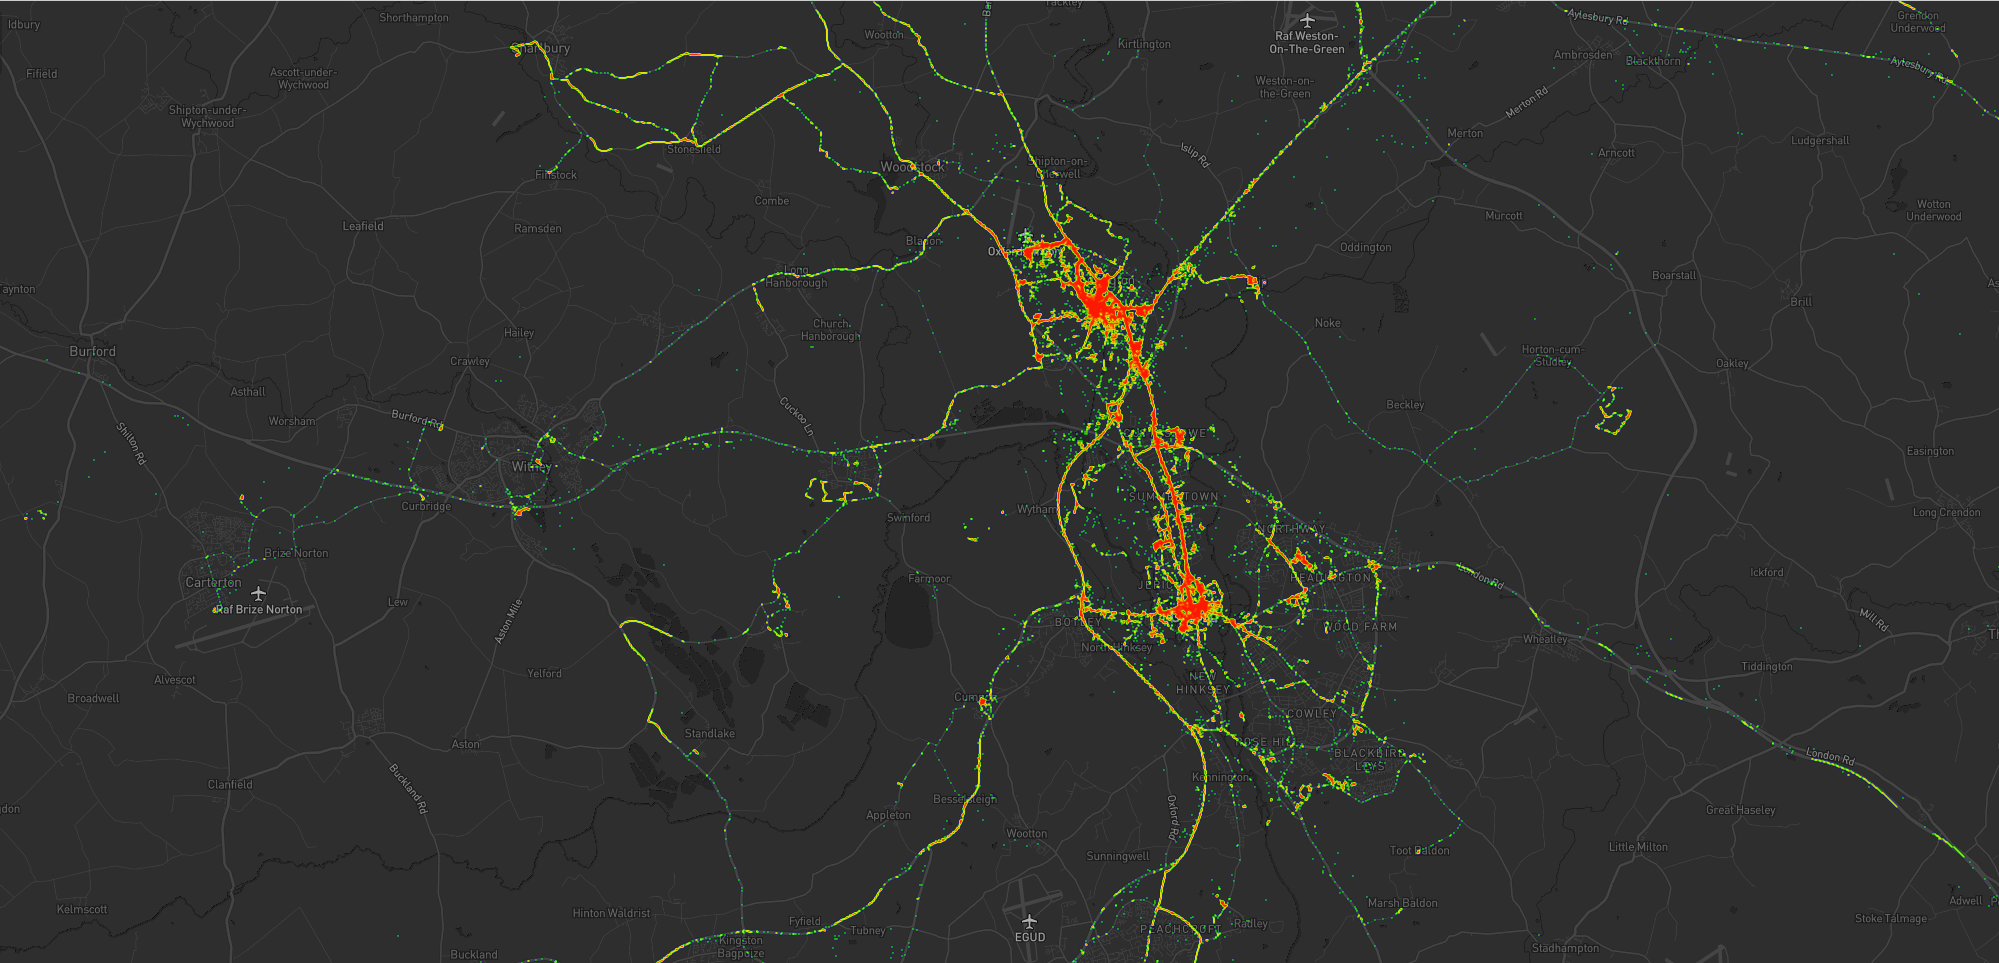
Let’s go back to the 7 years prior, when I lived in Kidlington. This paints a different picture:
For the seven years I lived in Kidlington I moved around a lot more than I have since: each hotspot tells a story, and some tell a few.
This heatmap highlights some of the ways in which my life was quite different. For example:
Most of my time was spent in my village, but it was a lot larger than the hamlet I live in now and this shows in the size of my local “blob”. It’s also possible to pick out common
destinations like the kids’ nursery and (later) school, the parks, and the routes to e.g. ballet classes, music classes, and other kid-focussed hotspots.
I worked at the Bodleian from early 2011 until late in 2019, and so I spent a lot of time in
Oxford City Centre and cycling up and down the roads connecting my home to my workplace: Banbury Road glows the brightest, but I spent some time on Woodstock Road too.
For some of this period I still volunteered with Samaritans in Oxford, and their branch – among other volunteering hotspots
– show up among my movements. Even without zooming in it’s also possible to make out individual venues I visited: pubs, a cinema, woodland and riverside walks, swimming pools etc.
Less-happily, it’s also obvious from the map that I spent a significant amount of time at the John Radcliffe Hospital, an unpleasant reminder of some challenging times from that
chapter of our lives.
The data’s visibly “spottier” here, mostly because I built the heatmap only out of the spatial data over the time period, and not over the full tracklogs (i.e. the map it doesn’t
concern itself with the movement between two sampled points, even where that movement is very-guessable), and some of the data comes from less-frequently-sampled sources like Google.
Eight to ten years ago
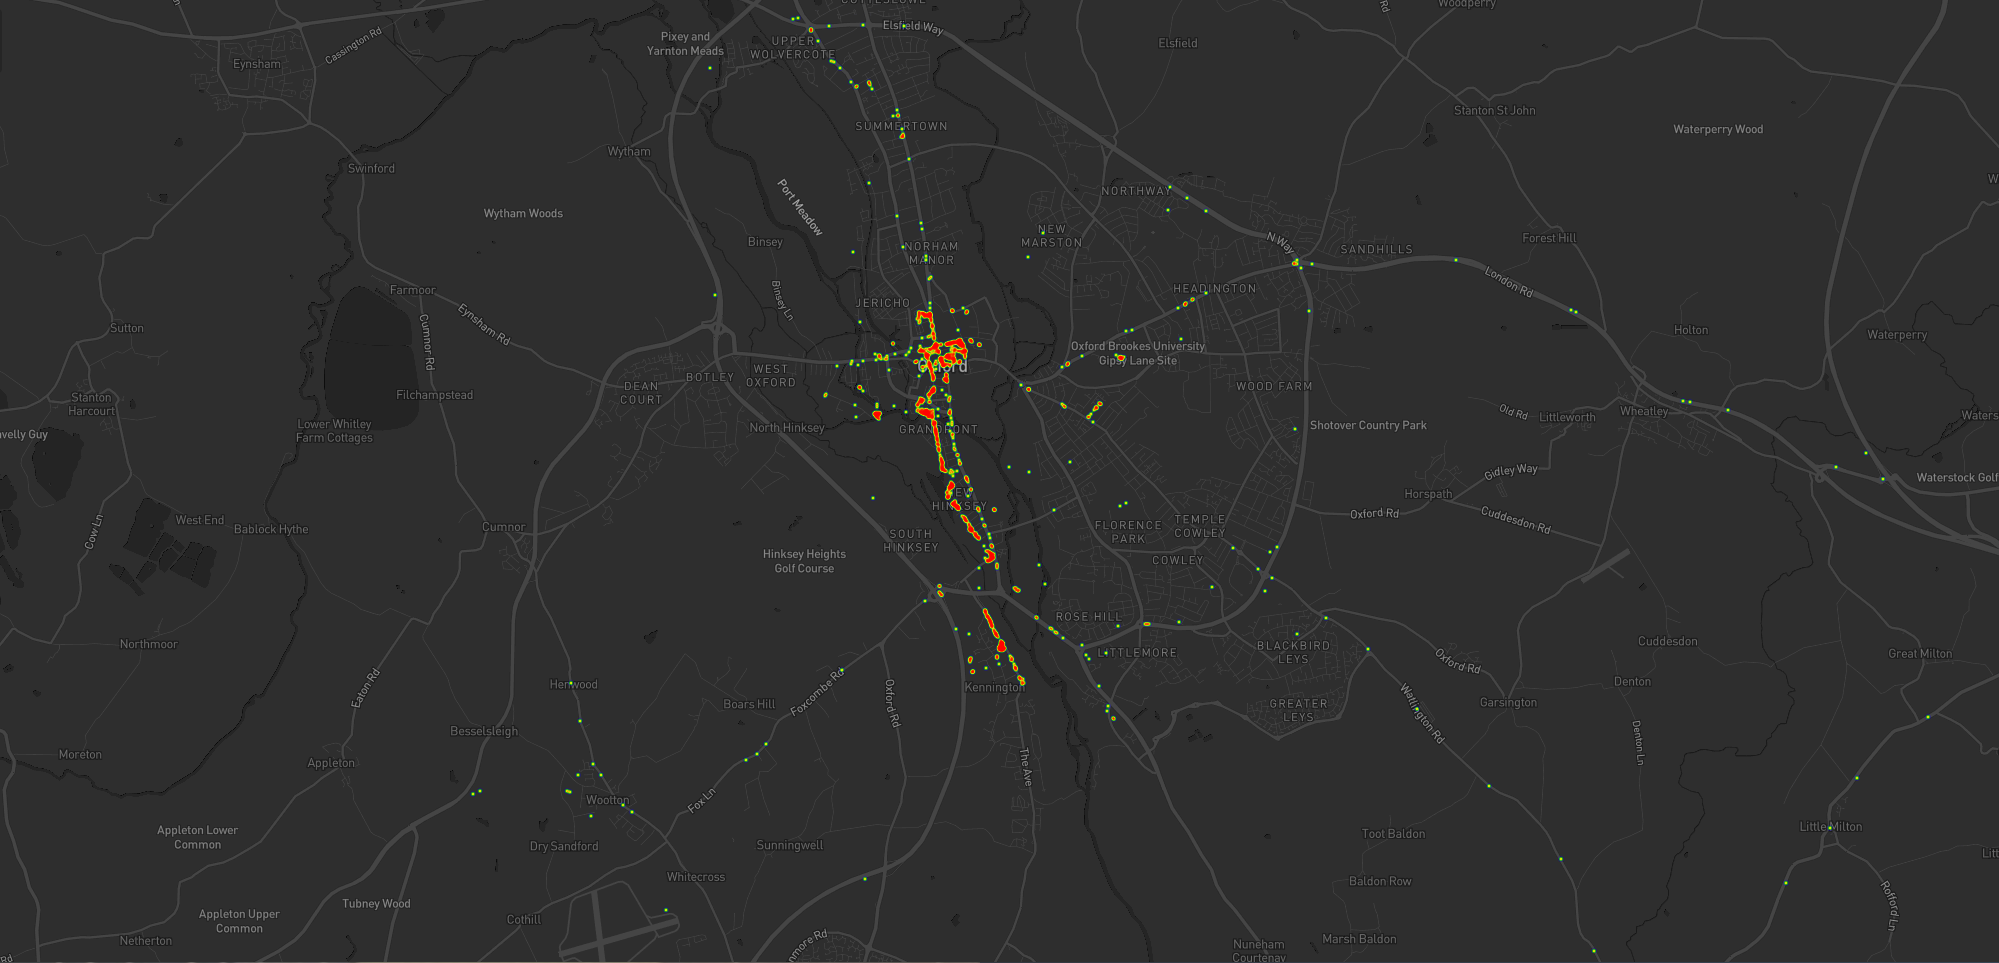
Let’s go back further:
Back when I lived in Kennington I moved around a lot less than I would come to later on (although again, the spottiness of the data makes that look more-significant than it is).
Before 2011, and before we bought our first house, I spent a couple of years living in Kennington, to the South of Oxford. Looking at
this heatmap, you’ll see:
I travelled a lot less. At the time, I didn’t have easy access to a car and – not having started my counselling qualification yet – I
didn’t even rent one to drive around very often. You can see my commute up the cyclepath through Hinksey into the City Centre, and you can even make out the outline of Oxford’s Covered
Market (where I’d often take my lunch) and a building in Osney Mead where I’d often deliver training courses.
Sometimes I’d commute along Abingdon Road, for a change; it’s a thinner line.
My volunteering at Samaritans stands out more-clearly, as do specific venues inside Oxford: bars, theatres, and cinemas – it’s the kind of heatmap that screams “this person doesn’t
have kids; they can do whatever they like!”
Every map tells a story
I really love maps, and I love the fact that these heatmaps are capable of painting a picture of me and what my life was like in each of these three distinct chapters of my life over
the last decade. I also really love that I’m able to collect and use all of the personal data that makes this possible, because it’s also proven useful in answering questions like “How
many times did I visit Preston in 2012?”, “Where was this photo taken?”, or “What was the name of that place we had lunch when we got lost during our holiday in Devon?”.
There’s so much value in personal geodata (that’s why unscrupulous companies will try so hard to steal it from you!), but sometimes all you want to do is use it to draw pretty heatmaps.
And that’s cool, too.
How these maps were generated
I have a μlogger instance with the relevant positional data in. I’ve automated my process, but the essence of it if you’d like to try it yourself is as follows:
First, write some SQL to extract all of the position data you need. I round off the latitude and longitude to 5 decimal places to help “cluster” dots for frequency-summing, and I raise
the frequency to the power of 3 to help make a clear gradient in my heatmap by making hotspots exponentially-brighter the more popular they are:
This data needs converting to JSON. I was using Ruby’s mysql2 gem to
fetch the data, so I only needed a .to_json call to do the conversion – like this:
db =Mysql2::Client.new(host: ENV['DB_HOST'], username: ENV['DB_USERNAME'], password: ENV['DB_PASSWORD'], database: ENV['DB_DATABASE'])
db.query(sql).to_a.to_json
Approximately following this guide and leveraging my Mapbox
subscription for the base map, I then just needed to include leaflet.js, heatmap.js, and leaflet-heatmap.js before writing some JavaScript code
like this:
body.innerHTML ='<div id="map"></div>';
let map = L.map('map').setView([51.76, -1.40], 10);
// add the base layer to the map
L.tileLayer('https://api.mapbox.com/styles/v1/{id}/tiles/{z}/{x}/{y}?access_token={accessToken}', {
maxZoom:18,
id:'itsdanq/ckslkmiid8q7j17ocziio7t46', // this is the style I defined for my map, using Mapbox
tileSize:512,
zoomOffset:-1,
accessToken:'...'// put your access token here if you need one!
}).addTo(map);
// fetch the heatmap JSON and render the heatmap
fetch('heat.json').then(r=>r.json()).then(json=>{
let heatmapLayer =new HeatmapOverlay({
"radius":parseFloat(document.querySelector('#radius').value),
"scaleRadius":true,
"useLocalExtrema":true,
});
heatmapLayer.setData({ data: json });
heatmapLayer.addTo(map);
});
Here’s a perfect example I bumped into earlier this week, courtesy of The Green Web Foundation. This looks like a
hyperlink… but if you open it in a new tab/window, you see a page (not even a 404 page!) with the text “It looks like nothing was found at this location.”
In the site shown in the screenshot above, the developer took something the web gave them for free (a hyperlink), threw it away (by making it a link-to-nowhere), and rebuilt its
functionality with Javascript (without thinking about the fact that you can do more with hyperlinks than click them: you can click-and-drag them, you can bookmark them, you can share
them, you can open them in new tabs etc.). Ugh.
Something you can clearly type a numeric day, month and year into is best.
Three dropdowns are slightly worse, but at least if you use native HTML <select> elements keyboard
users can still “type” to filter.
Everything else – including things that look like <select>s but are really funky React <div>s, is pretty terrible.
Calendars can be great for choosing your holiday date range. But pressing “Prev” ~480 times to get to my month of birth isn’t good. Also: what’s with the time “sliders”? (Yes, I know I’ve implemented these myself, in the past, and I’m sorry.)
People designing webforms that require me to enter my birthdate:
I am begging you: just let me type it in.
Typing it in is 6-8 quick keystrokes. Trying to navigate a little calendar or spinny wheels back to the 1970s is time-consuming, frustrating and unnecessary.
They’re right. Those little spinny wheels are a pain in the arse if you’ve got to use one to go back 40+ years.
These things are okay (I guess) on mobile/touchscreen devices, though I’d still prefer the option to type in my date of birth. But send one to my desktop and I will
curse your name.
Can we do worse?
If there’s one thing we learned from making the worst volume control in the world, the other
year, it’s that you can always find a worse UI metaphor. So here’s my attempt at making a date of birth field that’s somehow
even worse than “date spinners”:
My datepicker implements a game of “higher/lower”. Starting from bounds specified in the HTML code and a random guess, it
narrows-down its guess as to what your date of birth is as you click the up or down buttons. If you make a mistake you can start over with the restart button.
Amazingly, this isn’t actually the worst datepicker into which I’ve entered my date of birth! It’s cognitively challenging compared to most, but it’s relatively fast at
narrowing down the options from any starting point. Plus, I accidentally implemented some good features that make it better than plenty of the datepickers out there:
It’s progressively enhanced – if the Javascript doesn’t load, you can still enter your date of birth in a sensible way.
Because it leans on a <input type="date"> control, your browser takes responsibility for localising, so if you’re from one of those weird countries that prefers
mm-dd-yyyy then that’s what you should see.
It’s moderately accessible, all things considered, and it could easily be improved further.
It turns out that even when you try to make something terrible, so long as you’re building on top of the solid principles the web gives you for free, you can accidentally end
up with something not-so-bad. Who knew?
Among Twitter’s growing list of faults over the years are various examples of its increasing divergence from open Web standards and developer-friendly endpoints. Do you remember when
you used to be able to subscribe to somebody’s feed by RSS? When you could see who follows somebody without first logging in?
When they were still committed to progressive enhancement and didn’t make your browser download ~5MB of Javascript or else not show any content whatsoever? Feels like a long time ago,
now.
For one of the most-popular 50 websites in the world, this score is frankly shameful.
But those complaints aside, the thing that bugged me most this week was how much harder they’ve made it to programatically get access to things that are publicly accessible via web
pages. Like avatars, for example!
If you’re a human and you want to see the avatar image associated with a given username, you can go to twitter.com/that-username and – after you’ve waited
a bit for all of the mandatory JavaScript to download and run (I hope you’re not on a metered connection!) – you’ll see a picture of the user, assuming they’ve uploaded one and not made
their profile private. Easy.
If you’re a computer and you want to get the avatar image, it used to be just as easy; just go to
twitter.com/api/users/profile_image/that-username and you’d get the image. This was great if you wanted to e.g. show a Facebook-style facepile of images of people who’d retweeted your content.
But then Twitter removed that endpoint and required that computers log in to Twitter, so a clever developer made
a service that fetched avatars for you if you went to e.g. twivatar.glitch.com/that-username.
You want to that image? Well you’ll need a Twitter account, a developer account, an OAuth token set, a stack of code…
Recently, I needed a one-off program to get the avatars associated with a few dozen Twitter usernames.
First, I tried the easy way: find a service that does the work for me. I’d used avatars.io before but it’s died, presumably because (as I soon discovered) Twitter had made
things unnecessarily hard for them.
Second, I started looking at the Twitter API
documentation but it took me in the region of 30-60 seconds before I said “fuck that noise” and decided that the set-up overhead in doing things the official way simply wasn’t
justified for my simple use case.
So I decided to just screen-scrape around the problem. If a human can just go to the web page and see the
image, a computer pretending to be a human can do exactly the same. Let’s do this:
The code is ludicrously simple. It took less time, energy, and code to write this than to follow Twitter’s “approved” procedure. You can download the code via Gist.
Given that I only needed to run it once, on a finite list of accounts, I maintain that my approach was probably kinder on their servers than just manually going to every page
and saving the avatar from it. But if you set up a service that uses this approach then you’ll certainly piss off somebody at Twitter and history shows that they’ll take their displeasure out on you without warning.
This output shows the avatar URLs of a half a dozen Twitter accounts. It took minutes to write the code and takes seconds
to run, but if I’d have done it the “right” way I’d still be unnecessarily wading through Twitter’s sprawling documentation.
But it works. It was fast and easy and I got what I was looking for.
And the moral of the story is: if you make an API and it’s terrible, don’t be surprised if people screen-scape your
service instead. (You can’t spell “scraping” without “API”, amirite?)
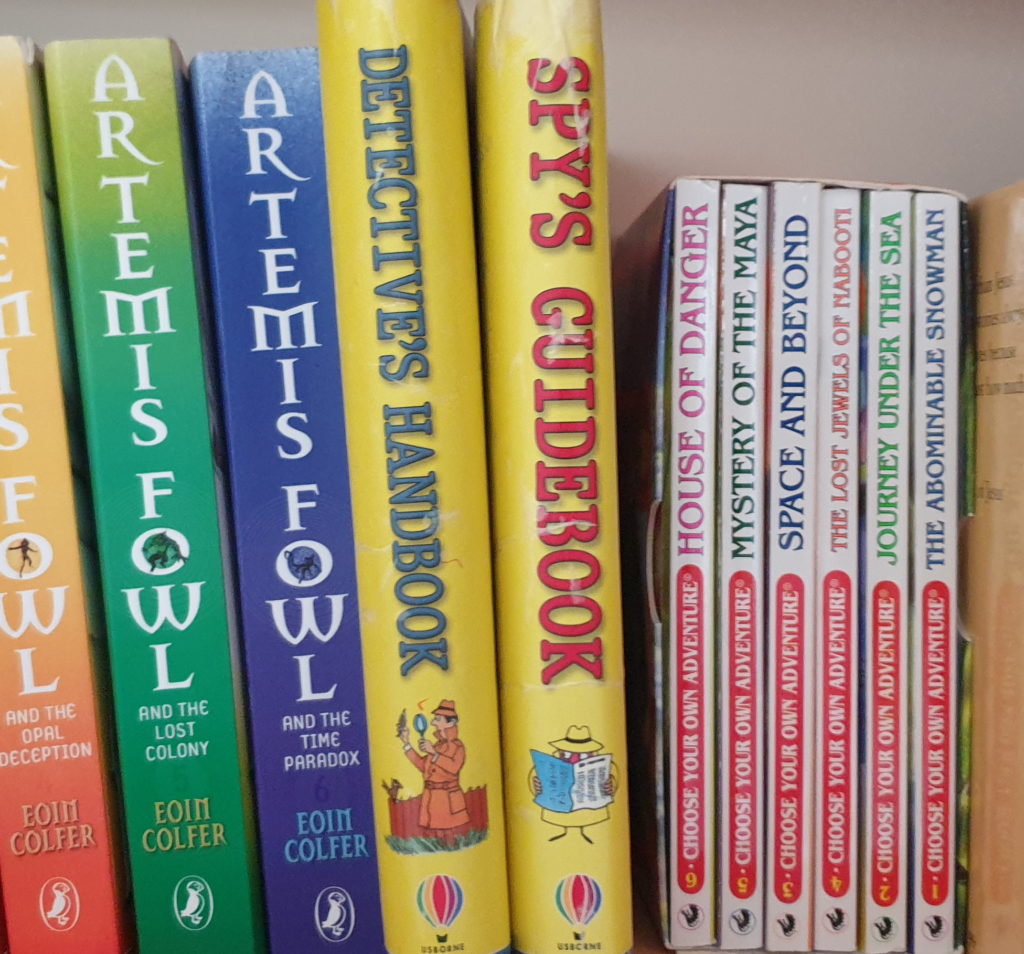
When I was a kid of about 10, one of my favourite books was Usborne’s Spy’s Guidebook. (I also liked its sister the Detective’s Handbook, but the Spy’s
Guidebook always seemed a smidge cooler to me).
I imagine that a younger version of me would approve of our 7-year-old’s bookshelf, too.
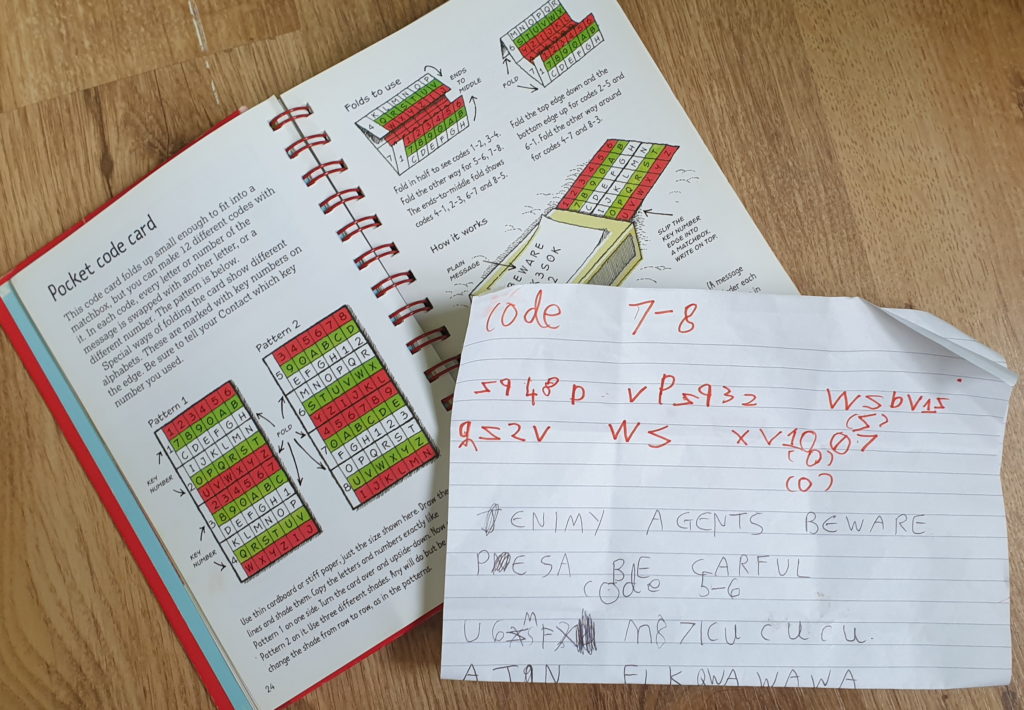
So I was pleased when our eldest, now 7, took an interest in the book too. This morning, for example, she came to breakfast with an encrypted message for me (along with the relevant
page in the book that contained the cipher I’d need to decode it).
Decryption efforts were hampered by sender’s inability to get her letter “Z”s the right damn way around.
Later, as we used the experience to talk about some of the easier practical attacks against this simple substitution cipher (letter frequency analysis, and known-plaintext attacks… I
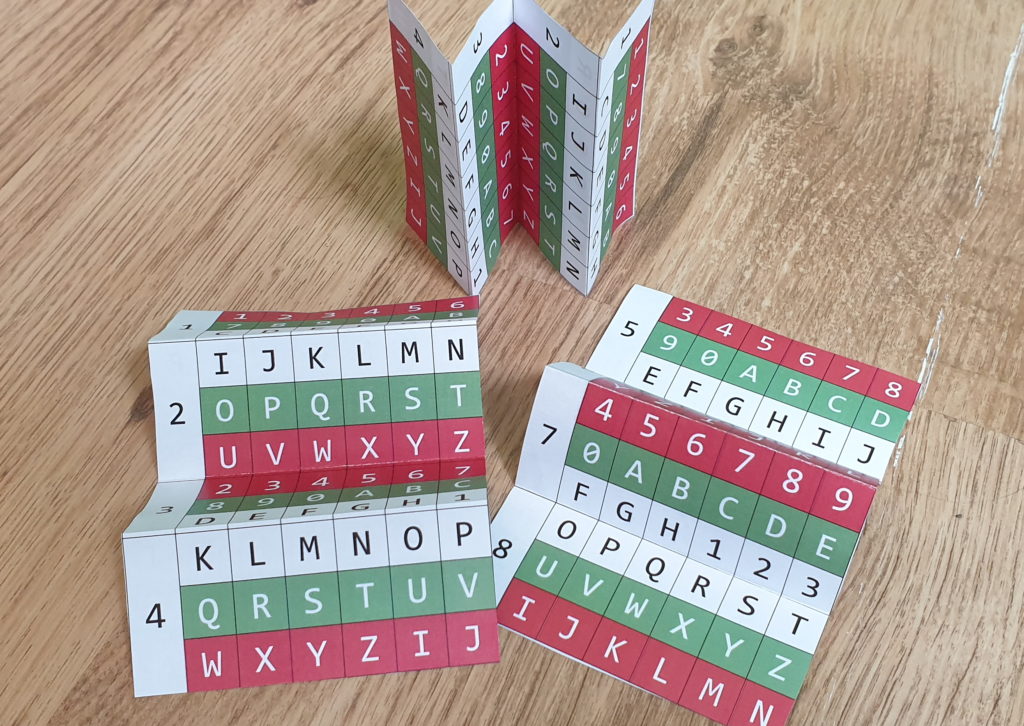
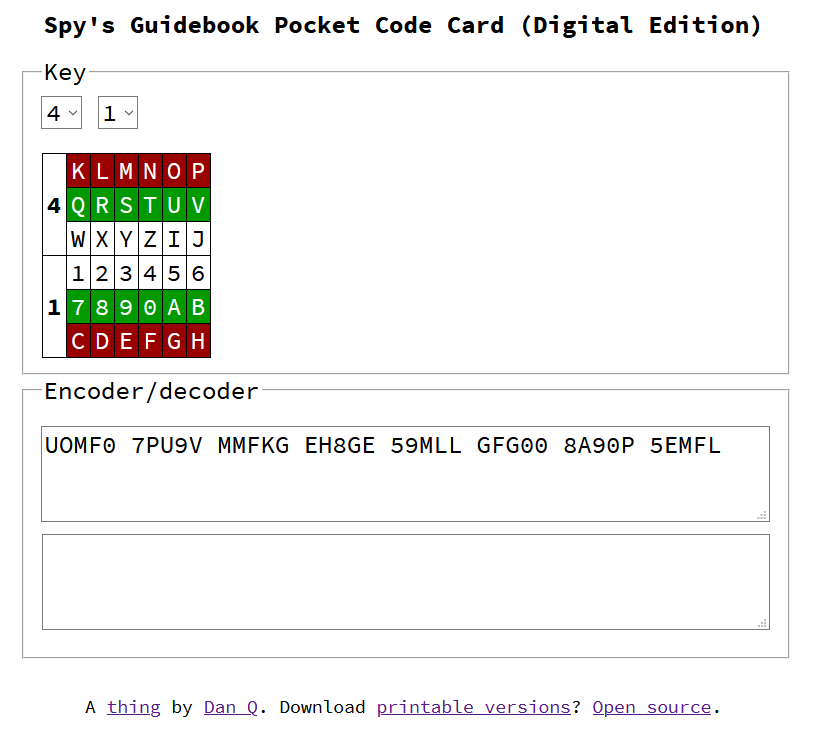
haven’t gotten on to the issue of its miniscule keyspace yet!), she asked me to make a pocket version of the code card as described in the book.
A three-bit key doesn’t make a simple substitution cipher significantly safer, but it does serve as a vehicle to teach elementary cryptanalysis!
While I was eating leftover curry for lunch with one hand and producing a nice printable, foldable pocket card for her (which you can download here if you like) with the other, I realised something. There are likely to be a lot more messages in my
future that are protected by this substitution cipher, so I might as well preempt them by implementing a computerised encoder/decoder right away.
If you’ve got kids of the right kind of age, I highly recommend picking up a copy of the Spy’s Guidebook (and possibly the Detective’s Handbook). Either use it as a
vehicle to talk about codes and maths, like I have… or let them believe it’s secure while you know you can break it, like we did with Enigma machines after WWII. Either way, they eventually learn a valuable lesson about cryptography.