I’ve got a (now four-year-old) Unraid NAS called Fox and I’m a huge fan. I particularly love the fact that Unraid can work not only as a NAS, but also as a fully-fledged Docker appliance, enabling me to easily install and maintain all manner of applications.
I was chatting this week to a colleague who was considering getting a similar setup, and he seemed to be taking notes of things he might like to install, once he’s got one. So I figured I’d round up five of my favourite things to install on an Unraid NAS that:
- Don’t require any third-party accounts (low dependencies),
- Don’t need any kind of high-powered hardware (low specs), and
- Provide value with very little set up (low learning curve).

Here we go:
Syncthing
I’ve been raving about Syncthing for years. If I had an “everyday carry” list of applications, it’d be high on that list.
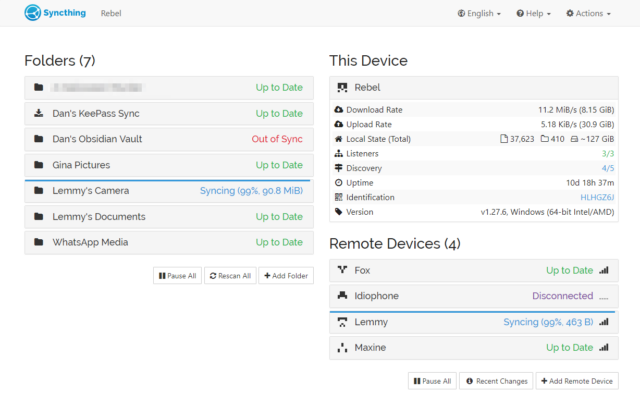
Here’s the skinny: you install Syncthing on several devices, then give each the identification key of another to pair them. Now you can add folders on each and “share” them with the others, and the two are kept in-sync. There’s lots of options for power users, but just as a starting point you can use this to:
- Manage the photos on your phone and push copies to your desktop whenever you’re home (like your favourite cloud photo sync service, but selfhosted).
- Keep your Obsidian notes in-sync between all your devices (normally costs $4/month).1
- Get a copy of the documents from all your devices onto your NAS, for backup purposes (note that sync’ing alone, even with versioning enabled, is not a good backup: the idea is that you run an actual backup from your NAS!).
Huginn
You know IFTTT? Zapier? Services that help you to “automate” things based on inputs and outputs. Huginn’s like that, but selfhosted. Also: more-powerful.

The learning curve is steeper than anything else on this list, and I almost didn’t include it for that reason alone. But once you’ve learned your way around its idiosyncrasies and dipped your toe into the more-advanced Javascript-powered magic it can do, you really begin to unlock its potential.
It couples well with Home Assistant, if that’s your jam. But even without it, you can find yourself automating things you never expected to.
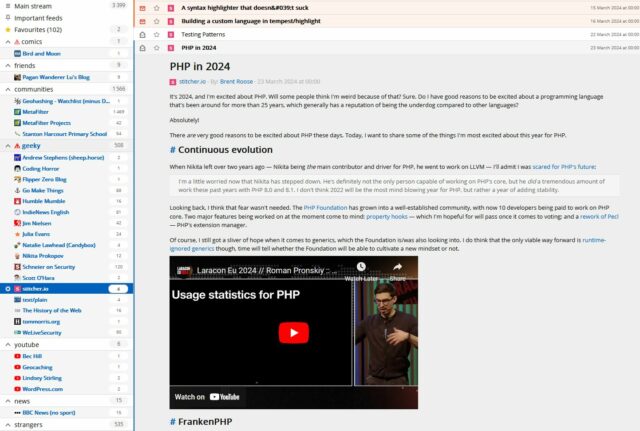
FreshRSS
I’ve written a lot about how and why FreshRSS continues to be my favourite RSS reader. But you know what’s even better than an awesome RSS reader? An awesome selfhosted RSS reader!
Many of these suggested apps benefit well from you exposing them to the open Web rather than just running them on your LAN, and an RSS reader is probably the best example (you want to read your news feeds when you’re out and about, right?). What you need for that is a reverse proxy, and there are lots of guides to doing it super-easily, even if you’re not on a static IP address.2. Alternatively you can just VPN in to your home: your router might be able to arrange this, or else Unraid can do it for you!
Open Trashmail
You know how sometimes you need to give somebody your email address but you don’t actually want to. Like: sure, I’d like you to email me a verification code for this download, but I don’t trust you not to spam me later! What you need is a disposable email address.3

You just need to install Open Trashmail, point the MX records of a few domain names or subdomains (you’ve got some spare domain names lying around, right? if not; they’re pretty cheap…) at it, and it will now accept email to any address on those domains. You can make up addresses off the top of your head, even away from an Internet connection when using a paper-based form, and they work. You can check them later if you want to… or ignore them forever.
Couple it with an RSS reader, or Huginn, or Slack, and you can get a notification or take some action when an email arrives!
- Need to give that escape room your email address to get a copy of your “team photo”? Give them a throwaway, pick up the picture when you get home, and then forget you ever gave it to them.
- Company give you a freebie on your birthday if you sign up their mailing list? Sign up 366 times with them and write a Huginn workflow that puts “today’s” promo code into your Obsidian notetaking app (Sync’d over Syncthing) but filters out everything else.
- Suspect some organisation is selling your email address on to third parties? Give them a unique email address that you only give to them and catch them in a honeypot.
YOURLS
Finally: a URL shortener. The Internet’s got lots of them, but they’re all at the mercy of somebody else (potentially somebody in a country that might not be very-friendly with yours…).
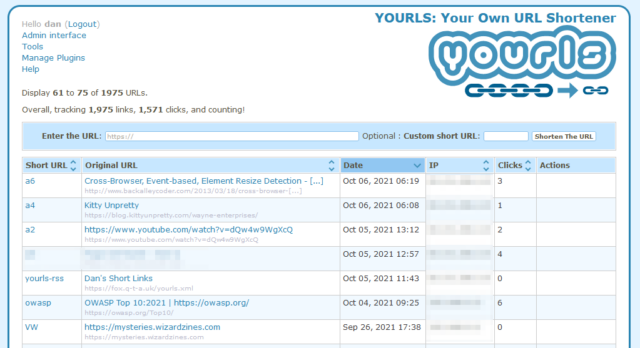
Plus, it’s just kinda cool to be able to brand your shortlinks with your own name, right? If you follow only one link from this post, let it be to watch this video that helps explain why this is important: danq.link/url-shortener-highlights.
I run many, many other Docker containers and virtual machines on my NAS. These five aren’t even the “top five” that I use… they’re just five that are great starters because they’re easy and pack a lot of joy into their learning curve.
And if your NAS can’t do all the above… consider Unraid for your next NAS!
Footnotes
1 I wrote the beginnings of this post on my phone while in the Channel Tunnel and then carried on using my desktop computer once I was home. Sync is magic.
2 I can’t share or recommend one reverse proxy guide in particular because I set my own up because I can configure Nginx in my sleep, but I did a quick search and found several that all look good so I imagine you can do the same. You don’t have to do it on day one, though!
3 Obviously there are lots of approachable to on-demand disposable email addresses, including the venerable “plus sign in a GMail address” trick, but Open Trashmail is just… better for many cases.