Foundry is a wonderful virtual tabletop tool well-suited to playing tabletop roleplaying games with your friends, no matter how far away they are. It compares very favourably to the market leader Roll20, once you get past some of the initial set-up challenges and a moderate learning curve.

You can run it on your own computer and let your friends “connect in” to it, so long as you’re able to reconfigure your router a little, but you’ll be limited by the speed of your home Internet connection and people won’t be able to drop in and e.g. tweak their character sheet except when you’ve specifically got the application running.
A generally better option is to host your Foundry server in the cloud. For most of its history, I’ve run mine on Fox, my NAS, but I’ve recently set one up on a more-conventional cloud virtual machine too. A couple of friends have asked me about how to set up their own, so here’s a quick guide:
You will need…
- A Foundry license ($50 USD / £48 GBP, one-off payment1)
- A domain name for which you control the DNS records; you’ll need to point a domain, like “danq.me” (or a subdomain of it, e.g. “vtt.danq.me”), at an IP address you’ll get later by creating an “A” record: your domain name registrar can probably help with this – I mostly use Gandi and, ignoring my frustration with recent changes to their email services, I think they’re great
- An account with a cloud hosting provider: this example uses Linode but you can adapt for any of them
- A basic level of comfort with the command-line
1. Spin up a server
Getting a virtual server is really easy nowadays.
You’ll need:
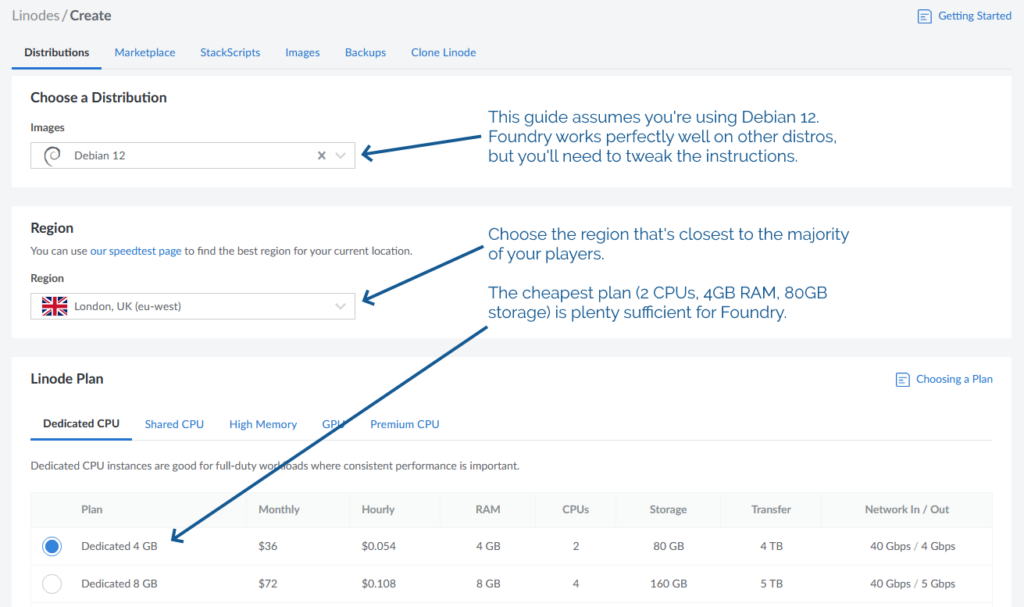
- The operating system to be Debian 12 (or else you’ll need to adapt the instructions below)
- The location to be somewhere convenient for your players: pick a server location that’s relatively-local to the majority of them to optimise for connection speeds
- Approximately 2 CPUs and 4GB of RAM, per Foundry’s recommended server specifications
- An absolute minimum of 1GB of storage space, I’d recommend plenty more: The Levellers’ campaign currently uses about 10GB for all of its various maps, art, videos, and game data, so give yourself some breathing room (space is pretty cheap) – I’ve gone with 80GB for this example, because that’s what comes as standard with the 2 CPU/4GB RAM server that Linode offer
Choose a root password when you set up your server. If you’re a confident SSH user, add your public key so you can log in easily (and then disable password authentication entirely!).
For laziness, this guide has you run Foundry as root on your new server. Ensure you understand the implications of this.2
2. Point your (sub)domain at it
DNS propogation can be pretty fast, but… sometimes it isn’t. So get this step underway before you need it.
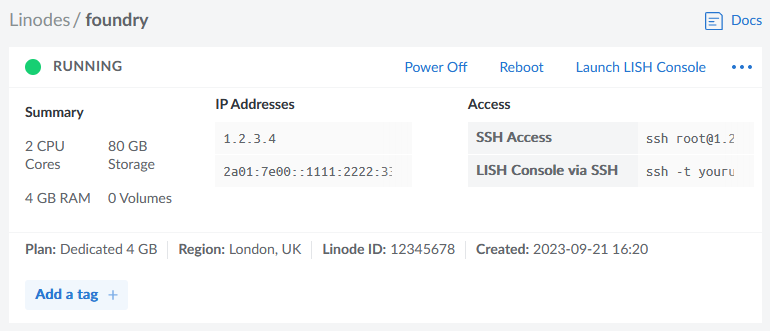
Your newly-created server will have an IP address, and you’ll be told what it is. Put that IP address into an A-record for your domain.

3. Configure your server
In my examples, my domain name is vtt.danq.me and my server is at 1.2.3.4. Yours will be different!
Connect to your new server using SSH. Your host might even provide a web interface if you don’t have an SSH client installed: e.g. Linode’s “Launch LISH Console” button will do pretty-much exactly that for you. Log in as root using the password you chose
when you set up the server (or your SSH private key, if that’s your preference). Then, run each of the commands below in order (the full script is available as a single file if you
prefer).
3.1. Install prerequisites
You’ll need unzip (to decompress Foundry), nodejs (to run Foundry), ufw (a firewall, to prevent unexpected surprises), nginx (a
webserver, to act as a reverse proxy to Foundry), certbot (to provide a free SSL certificate for Nginx),
nvm (to install pm2) and pm2 (to keep Foundry running in the background). You can install them all like this:
apt update
apt upgrade
apt install -y unzip nodejs ufw nginx certbot nvm
npm install -g pm2
3.2. Enable firewall
By default, Foundry runs on port 30000. If we don’t configure it carefully, it can be accessed directly, which isn’t what we intend: we want connections to go through the webserver (over https, with http redirecting to https). So we configure our firewall to allow only these ports to be accessed. You’ll also want ssh enabled so we can remotely connect into the server, unless you’re exclusively using an emergency console like LISH for this purpose:
ufw allow ssh
ufw allow http
ufw allow https
ufw enable
3.3. Specify domain name
Putting the domain name we’re using into a variable for the remainder of the instructions saves us from typing it out again and again. Make sure you type your domain name (that you pointed to your server in step 2), not mine (vtt.danq.me):
DOMAIN=vtt.danq.me
3.4. Get an SSL certificate with automatic renewal
So long as the DNS change you made has propogated, this should Just Work. If it doesn’t, you might need to wait for a bit then try again.
certbot certonly --agree-tos --register-unsafely-without-email --rsa-key-size 4096 --webroot -w /var/www/html -d $DOMAIN
Don’t continue past this point until you’ve succeeded in getting the SSL certificate sorted.
The certificate will renew itself automatically, but you also need Nginx to restart itself whenever that happens. You can set that up like this:
printf "#!/bin/bash\nservice nginx restart\n" > /etc/letsencrypt/renewal-hooks/post/restart-nginx.sh
chmod +x /etc/letsencrypt/renewal-hooks/post/restart-nginx.sh
3.5. Configure Nginx to act as a reverse proxy for Foundry
You can, of course, manually write the Nginx configuration file: just remove the > /etc/nginx/sites-available/foundry from the end of the printf line to see
the configuration it would write and then use/adapt to your satisfaction.
set +H
printf "server {\n listen 80;\n listen [::]:80;\n server_name $DOMAIN;\n\n # Redirect everything except /.well-known/* (used for ACME) to HTTPS\n root /var/www/html/;\n if (\$request_uri !~ \"^/.well-known/\") {\n return 301 https://\$host\$request_uri;\n }\n}\n\nserver {\n listen 443 ssl http2;\n listen [::]:443 ssl http2;\n server_name $DOMAIN;\n\n ssl_certificate /etc/letsencrypt/live/$DOMAIN/fullchain.pem;\n ssl_certificate_key /etc/letsencrypt/live/$DOMAIN/privkey.pem;\n\n client_max_body_size 300M;\n\n location / {\n # Set proxy headers\n proxy_set_header Host \$host;\n proxy_set_header X-Forwarded-For \$proxy_add_x_forwarded_for;\n proxy_set_header X-Forwarded-Proto \$scheme;\n\n # These are important to support WebSockets\n proxy_set_header Upgrade \$http_upgrade;\n proxy_set_header Connection \"Upgrade\";\n\n proxy_pass http://127.0.0.1:30000/;\n }\n}\n" > /etc/nginx/sites-available/foundry
ln -sf /etc/nginx/sites-available/foundry /etc/nginx/sites-enabled/foundry
service nginx restart
3.6. Install Foundry
3.6.1. Create a place for Foundry to live
mkdir {vtt,data}
cd vtt
3.6.2. Download and decompress it
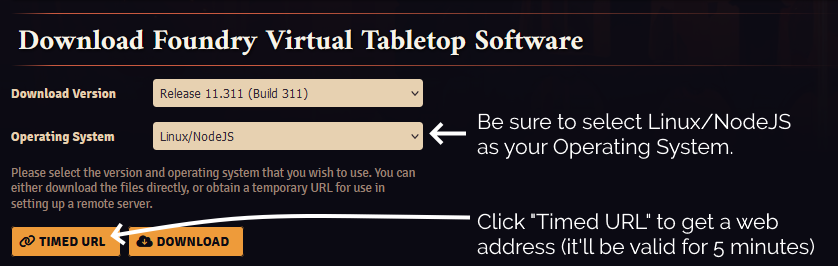
Substitute in your Timed URL in place of <url from website> (keep the quotation marks – " –
though!):
wget -O foundryvtt.zip "<url from website>"
unzip foundryvtt.zip
rm foundryvtt.zip
3.6.3. Configure PM2 to run Foundry and keep it running
Now you’re finally ready to launch Foundry! We’ll use PM2 to get it to run automatically in the background and keep running:
pm2 start --name "Foundry" node -- resources/app/main.js --dataPath=/root/data
You can watch the logs for Foundry with PM2, too. It’s a good idea to take a quick peep at them to check it launched okay (press CTRL-C to exit):
pm2 logs 0
4. Start adventuring!

https://vtt.danq.me) and you should see Foundry’s first-load page, asking for your license key.
Provide your license key to get started, and then immediately change the default password: a new instance of Foundry has a blank default password, which means that anybody on Earth can administer your server: get that changed to something secure!
Now you’re running on Foundry!
Footnotes
1 Which currency you pay in, and therefore how much you pay, for a Foundry license depends on where in the world you are
where your VPN endpoint says you are. You might like to plan accordingly.
2 Running Foundry as root is dangerous, and you should consider the risks for yourself. Adding a new user is relatively simple, but for a throwaway server used for a single game session and then destroyed, I wouldn’t bother. Specifically, the risk is that a vulnerability in Foundry, if exploited, could allow an attacker to reconfigure any part of your new server, e.g. to host content of their choice or to relay spam emails. Running as a non-root user means that an attacker who finds such a vulnerability can only trash your Foundry instance.
0 comments